The History of my Model Railway Setup
April 1997

Originally I had planned to use my old M-Track for the non-visible parts of the shadow railway station (Schattenbahnhof). However, during test runs there were quite a lot of derailments. Steam locomotives of the series 41 derailed on normal turnouts, as soon as the speed was somewhat faster. The reason for this is the relatively stiff suspension on these locomotives. Modifications to the guide rails on these turnouts brought only insignificant improvement. The older style electric locomotives of the series E18 / E19 caused further problems by consistent derailments on curved turnouts.

A further nuisance are the loud running noises, even though I attached the tracks with Maerklin sound deadening strips 7171. The biggest problem was the unreliable switching operation of the turnouts. I use reed contacts and accordingly I glued magnets underneath the locomotives. Over time the turnout "tongues" became magnetic and stayed "glued" to the rails. Increasing the spring tension brought only a short-term improvement. All this convinced me to swap the M-Track for the newer K-Track with turnouts made from aluminum. Trains ran much quieter and there were no more derailments. The locomotives stay on the tracks, even at unrealistically high speeds. Turnouts function reliably.

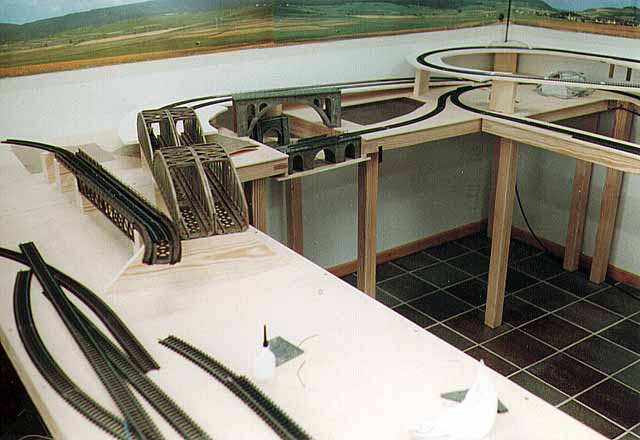
My initial plan called for a six-track shadow railway station (Schattenbahnhof) on the lowest level. However, even with the first test runs, I had more than six trains and accordingly I expanded the station with two further shunting tracks. The two new tracks are situated somewhat inconveniently, so that accident free control is only guaranteed through the computer (see also the track layout on page 1). Of course this was not satisfactory and I implemented a second "Schattenbahnhof" with 4 shunting tracks on the upper level. I hoped to realize interesting operational situations with 12 hidden trains.

While I built the side route on the left part of the layout, I noticed a large unused area. Unfortunately I couldn't build a regular "Schattenbahnhof" there, since there is only one access track. Thus I got the idea to build a five-track shunting yard for shuttle trains. Access happens via a track triangle and all other trains are guided alongside this area. Here too, the computer looks after the completely automatic exchange of trains. Now I am capable of hiding a total of 17 trains within my setup.

The single-track side route crosses a small hanging canyon via the "Steigenbogenbruecke bei Zernez" from Kibri (B-9652). The "Bombenzviadukt" (Kibri B-9650) behind it, will later carry a track to the uppermost level and is only mounted temporarily on this photograph. The appearance of both bridges was altered with paint. The double-track main route crosses the side route over a Maerklin 7263 Arched Bridge.
To eliminate the toy like plastic appearance of the Maerklin bridge I used brush and paint. I disassembled the arched bridge and painted it evenly with gray-green paint. Paint of this color is frequently used for rust prevention. To avoid a "like new" look, I applied rust brown spots with the "graining" technique. To use this technique, one has to paint with a nearly dry brush, so that only the raised parts, such as edges and rivets, are covered in paint and thus look "rusty". The bridge beside it got the same treatment, except here the base paint is dark brown. Thus the bridge looks quite old and very rusty.
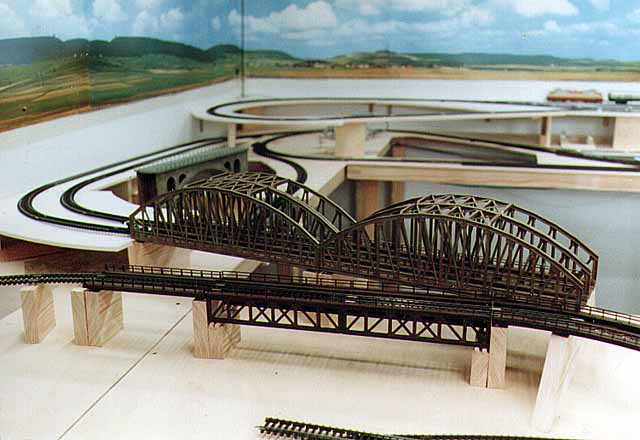
The long bridge is also from Maerklin, even though at first glance it does not look like it. Earlier, the truss bridge 7262 hat a separate metal handrail for pedestrians, but in the current model this handrail is integrated into the truss construction. I removed the truss part and re-attached it the wrong way round to obtain the bridge that can be seen in the picture. I used fast acting plastic glue to connect the two bridges and was thus able to span the 36-cm gap. Since the clearance for the side route would now have been too low, I used a straight ramp 7268 to the left.
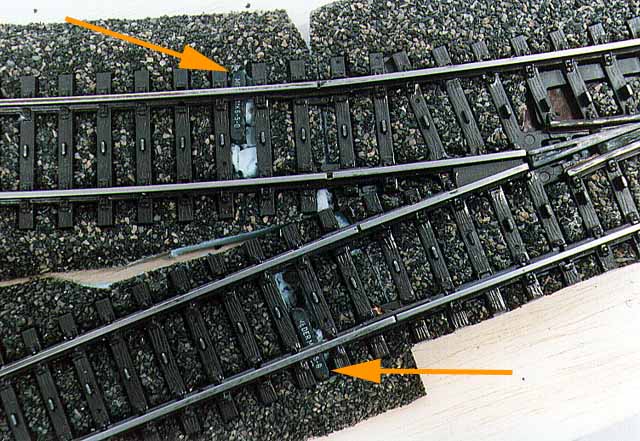
To signal contacts, I use so-called reed contacts (orange arrows) from an electronics supply store. They only cost DM2.30, while Maerklin charges a fat DM15.00 for much larger units. Originally I had planned to place these reed contacts in the middle between the tracks, but activation was not reliable. Placed asymmetrically, under one of the rails, they work perfectly. I exclusively use the Maerklin magnets 7557 and 7558, because they are very strong. I had poor success with 7556 magnets and also with cheaper magnets from mail order companies.
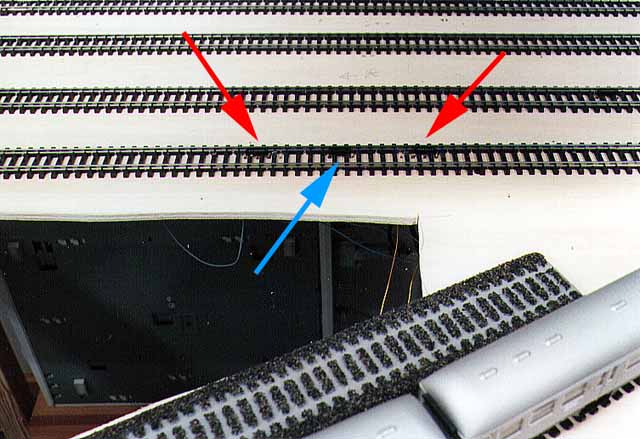
In non-visible areas I mounted the reed contacts alongside the point contacts. To recognize the driving direction there are 3 reed contacts mounted, one behind the other. The two outside ones (red arrows) activate a Maerklin relay 7244, while the one in the middle (blue arrow) is connected via a switching module with two feeds of a s88 decoder. Since I only require one switching module and the 7244 unit contains two relays, I modified it in such a way, that I can activate the relays separately. How this can be done is mentioned on
page 2: Relay 7244.